 Browse Clocks Browse Clocks
From the Files menu, choose Browse Clocks.
Here, you'll be able to edit format clocks while lining up several hours side by side.
A selection-box screen appears first. It lists all format clocks that have
already been built. Click each one that you would like to
include on your edit screen.
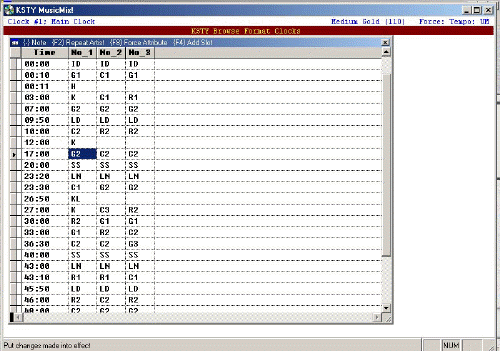
On the browse screen, down the left side you'll see each minute of the hour.
Each column is a different format clock. At the bottom of the screen you'll see the
clock name on the left and a description of the currently highlighted item on
the right. The description includes the rotation name with any forced
attributes, or program note contents. Most of the concepts in the help topic
Format Clocks apply here.
Add Minutes:
Press {F4} to add a new line available to all clocks.
Program Notes:
Enter a hyphen {-} on any slot that you want a note. A window pops up to allow
input of the text of the note. To change an existing note, highlight the hyphen
and press {F9}.
Force Attributes:
Press {F8} after you have entered a valid rotation-code, you'll then be given an
opportunity to "force" a particular music attribute in that slot.
Double Plays:
You may also schedule a special "Repeat" title by pressing {F2} at any slot.
This is used to program a "double play" of one artist. You'll be shown a
selection box listing all available rotations. Select all rotations that are
acceptable for the system to use in finding a second title by the artist just
played. Press {Esc} after you've selected all rotations.
After you have completed work in the browse window, press {Esc}. A "Ready to
Exit; Save Changes?" dialogue box appears. The system
offers three options:
Yes (Save Changes):
Saves all browsed clocks to disk (erasing the old versions) and exits.
No (Discard Changes):
Exits without saving your work. Leaves the old clock versions as they were.
Cancel (Return to Browse):
Allows you to continue working on the clocks.