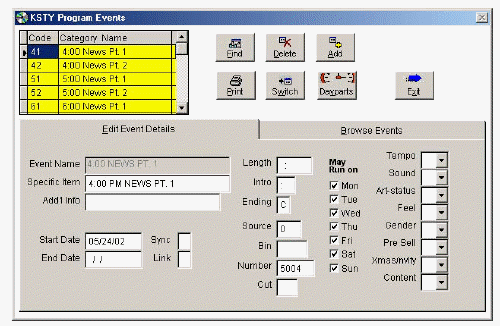
From the Files menu, choose Events.
Events are non-music, items that play on-air (jingles, I.D.s,
breakers, voice-tracks, etc.) You may set start and end dates, specify days of the week
that items may run, or exclude events from running in certain hours.
The events input screen is divided into two windows. The top window is used for entering "Event Categories," the bottom for "Specific Items" in each category.

Program events are divided into "event categories." Each category must contain one or more "specific event items." A category might be "Jingles." The specific items might be "Up-Tempo Shotgun," "Brass and Vocal," "Full Sing," etc.
Event categories contain a one or two character code which will be used in your format clocks to schedule each program event. The code may not be the same as any music rotation code.
The bottom (Specific Items) window contains two pages: "Edit Event Details" and "Browse Events." In "Edit Event Details" you may view all details and work on one specific item at a time. Click the page tab or keyboard {Alt}+{B} to switch to the "Browse Events" page and view or edit a complete listing of all specific items assigned to a category. In browse, youíll move from column to column to enter event item information rather than seeing it laid out on one screen.
Event Name/Specific Item:
The "Event Name" in the "Edit Event Details" window will show up on the
printed playlist in the "Artist" column, and the "Specific Item" will show up
under "Title."
Add'l Info/Length/Intro/Ending:
These fields are optional and do not affect scheduling.
Start & End Dates:
If you wish to limit the dates during which your item may run, you may enter a
start and end date. If you leave them blank, the item can run anytime. If you
set end dates so that every event item is expired, and the event category is
scheduled in a format clock, an expired event will schedule. Be sure at least
one item's end date is later than the day you're scheduling.
Source Numbers:
Enter the "Source," "Bin," and "Number" just as you do for music. This
information tells your digital automation where to find the event item.
Following are several automation-specific selections available
on this screen. Check the technical specifications
for your system to see whether your system supports them.
Sync:
Sync is used to cause an event to happen at a specific time. Your digital
automation may have codes to designate soft-sync and hard-sync events. Soft Sync
waits for the event on air when the time occurs to finish, then jumps to the
event item marked as Soft Sync (i.e. after the last song that will fit in an
hour, skip over optional songs and jump to the I.D.). Hard Sync immediately
fades the item on the air and jumps to the event item marked Hard Sync (i.e.
dump out of an instrumental to join the network). You will need to enter the
specific codes based on your digital automation systemís configuration.
Link:
Linked Events assure that two back to back program elements do not become
separated (by a sync). Normally links are used to assure correct intros and
outros in voice tracking. If you schedule a "Link to Following" program item,
and it plays as a time scheduled for a sync arrives, it will play the following
(linked) program element before executing the sync jump.
May Run On:
If you want to allow your event item to play only on certain days of the week (i.e.
a weekend breaker), you may mark those days on which it may schedule.
1) With the top window active, click Add to create a new event category.
2) Enter a one or two character code and a description.
Example:
Code: "ID"; Description: "Top of Hour I.D."
3) Click Switch to activate the Edit Event Details (Specific Items) window. The Event Name is filled in by the system with the event category. (e.g. "Top of Hour ID"). The specific item is the unique item name. (e.g. "Workday Variety")
4) Fill in applicable boxes for the specific event item.
5) If you want more specific event items in
this category, click Add and fill in the boxes for each item.
The push-buttons across the bottom of the screen apply to the currently active (yellow) window. (When the category window is active, click Add to add a new category. When the items window is active click Add to add a new specific item within the category).
Find:
Locate an event category.
Delete:
When the top window is active, delete event category. When the bottom
window is active, delete specific event item.
Add:
With the top window active, creates a new event category. With the
bottom window active, add a new specific item to the current event category.
Print:
Print a listing of all program events.
Switch:
Change to the non-active window.
Dayparts:
Click Dayparts to exclude certain hours when the event item should not be
scheduled. This procedure works the same as Dayparting Titles.
--------------------------
See Also: Format Clocks, Dayparting Titles,
Source/Bin/No.,
Voice Tracking